

The acronym CGR stands for Catia Graphics Representation, it is a tessellated file format similar to .stl, which you are probably more familiar with. Data in this format cannot be simply read by CATIA in a way, that allows user to extract, measure* or export a geometry.
To do so, you have to use a dedicated tools or a "trick". In this post I will try to present some of these tricks.
(*measure exact values)
I. Extracting geometry from .cgr using Measure Item
This is the simplest way, but also the least powerful (only points and lines can be extracted). Assembly Design workbench is required.
1. Create a new CATProduct or use existing one.
2. Insert to this product an existing file in .cgr format - Fig.1.
 |
| Fig.1 |
 |
| Fig.2 |
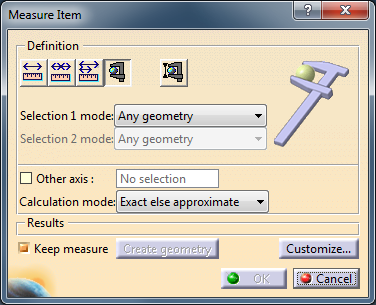
5. To extract points click on Create geometry button in Measure Item window.
6. In the new window - Geometry Creation - you can create a new CATPart or select existing one to insert the geometry - Fig.3. To create a new Part just click on OK.
 |
| Fig.3 |
 |
| Fig.4 |
 |
| Fig.5 |
II. Extracting geometry from .cgr using DMU Optimizer tools
With this method a .cgr file is saved as a surface model, DMU Optimizer workbench is required.
1. Insert a .cgr file into CATProduct - Fig.1.
2. Open DMU Optimizer workbench and look for a DMU Optimizer toolbar shown on Fig.6.
 |
| Fig.6 |
 |
| Fig.7 |
 |
| Fig.8 |
6. Double click on *Master and copy *SET1 - Fig.9.
 |
| Fig.9 |
 |
| Fig.10 |
 |
| Fig.11 |